
It can be frustrating to get the hang of assessing the images on the back of your camera. While you shoot, you check back on them time and again to ensure that you are getting it right. But when you upload them onto your computer, they end up looking different. What’s going on? They looked beautiful and vibrant on the back of your camera and now, after you’ve uploaded them to your computer, they are dull, flat, and lifeless.
It turns out that there are a lot of changes that take place when you view your RAW image in your editing program. If you want to bring your image closer to the original look that you saw on the back of your camera, the good news is that you only need one button to do it.

Uploading your image
When you look at your RAW image in your editing suite, it can look very flat and dull. Staring at it, you might feel like you’re a horrible photographer and you didn’t manage to capture a great shot at all. Where has all of the color gone? What about the lovely contrast? Why is it so boring now?
Then you look back at the files on your camera and you realize that you were right. It DID look so much better on your camera while you were shooting. These shots barely look like they are the same one! So, what happened?
The fact is that your camera will display the JPEG version of your image as a preview. The JPEG does tend to look more vibrant and inspiring at first glance. The reason for this is that your RAW file is like a blank slate, waiting to be used – it has endless possibilities. You can’t see those possibilities at first, but they are waiting just below the surface. It might be uninspiring for you and you may be tempted to go back to just shooting in JPEG format. But you know the benefits of shooting in RAW format, so here you sit stuck in the middle, unsure of how to find a middle ground.
The good news is, there IS a middle ground. The best way to do this is to jumpstart your editing by taking it back to the image that you see on your camera screen.
Opening in Lightroom
Get your RAW file opened up in Lightroom, where you can use all of the powerful tools to get your image to the place where you want it. After selecting it from the library tab, head on over to the develop tab. This is where all of the magic happens!
In this tab you will find a lot of different options waiting for you. Skip right down to the end, where you will see a dropdown section called ‘Camera Calibration’. You can close up all of the other sections if it helps you to find it easier.
There’s a handy tab here called ‘profile’, which has a lot of dropdown options to choose from. These are Adobe Standard, which is probably the one you have open already; Camera Landscape; Camera Neutral; Camera Portrait; Camera Standard; and Camera Vivid.
Here you can see how it’s done in Lightroom:
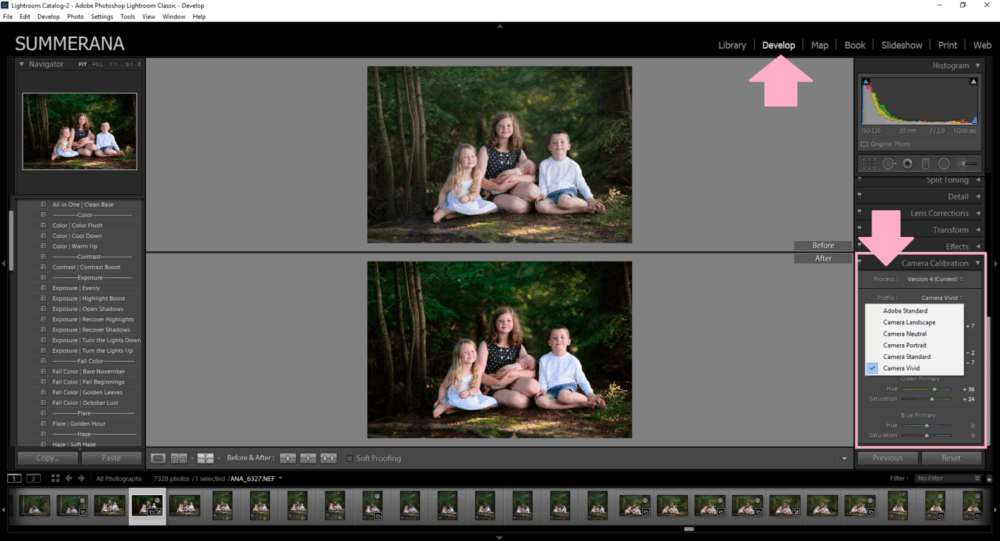
Click them one by one and see what the differences are. Instantly, a change will come over your image as the Lightroom software selects the settings that apply to this profile. Different profiles work for different images, and you may be surprised to see what a difference they make. Afterwards, you can play with the sliders directly below to change it up to your liking.
Choose the one that looks most like the back of your camera did – or find the one that looks even better than that! This is a great start to your editing and may mean that most of the work is already done for you. With a shot that you nailed in-camera, there may not be much more to do!
Now that you’ve read all about how to get that back of camera effect in Lightroom, you may want a visual learning aid. Make sure to watch this video from Grace Pamela, which will demonstrate the technique described above and show you exactly where to find all of those menu items if you need some help.
Opening in Photoshop
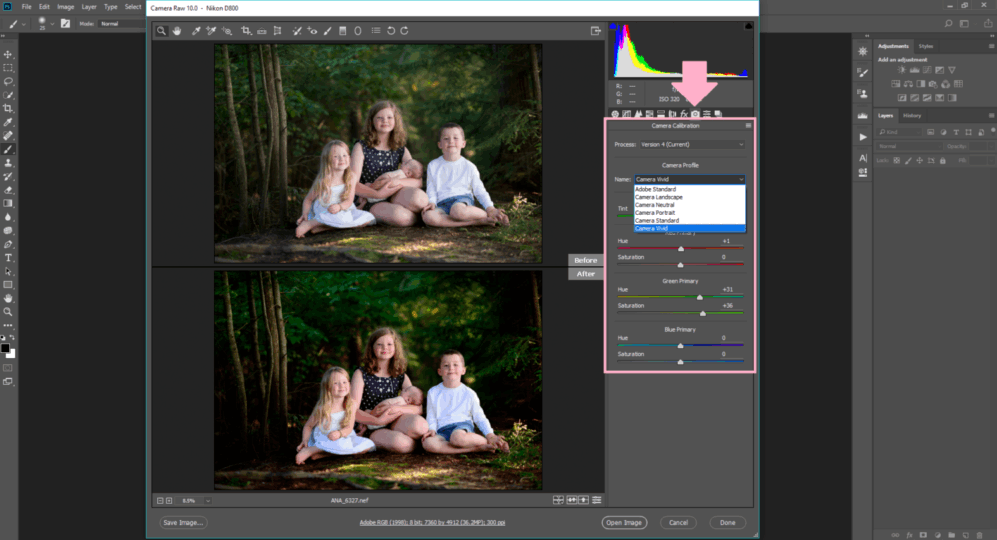
Not many photographers know that you can also edit your raw images in Photoshop’s Adobe Camera Raw. This is similar to how to edit your raw photos in Lightroom, but it is set up just a bit differently as it is a different program.
In ACR, to get to the same settings, you would select the camera icon, which will take you to a section called ‘Camera Calibration’ which has a lot of dropdown options to choose from. These are Adobe Standard, which is probably the one you have open already; Camera Landscape; Camera Neutral; Camera Portrait; Camera Standard; and Camera Vivid.
Here you can see how it’s done in Photoshop:
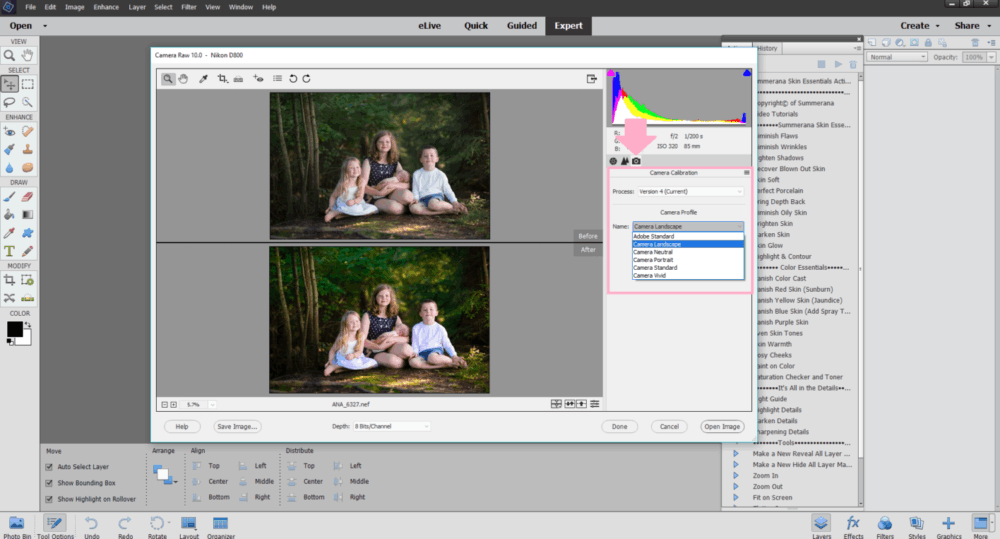
Here you can see how it’s done in Photoshop Elements:
Click them one by one and see what the differences are. Instantly, a change will come over your image as your ACR software selects the settings that apply to this profile. Afterwards, you can play with the sliders directly below to change it up to your liking.
Watch Grace Pamela show you how to do this in Photoshop’s Adobe Camera Raw and in Photoshop Elements:
When you get into a groove with using this software you will probably find that you have one or two favorite profiles that you use the most often, and you can go to them quickly and easily whenever you start to edit.
Taking it further
Once you have chosen your profile, you can take it a bit further and tweak some of the settings before you save it as a JPEG file (or whichever file format works for you).
You should see the profile as a starting point which you can build on and improve. Simply put, the camera isn’t capable of capturing something as vivid and bold as the human eye can actually see.
This means that you do have to make edits with every photograph you take. The most basic form of editing is color correction, in which you aim to make the colors of your photograph the same as the colors which you actually saw in person. Above this you can play with the brightness levels and the contrast of the image, and then go on to tweaking things until they look even better than real life.
You could also apply one-click presets if working in Lightroom or play editing actions if you are working in Photoshop. Presets and actions are groups of settings which have already been put together, allowing you to edit an image in just one more click.
Lightroom presets and Photoshop actions are really powerful, but they work even better when you get that base image right – and using the profile makes that easier than ever.
When you use these two techniques together, you can end up with a gorgeously edited image after choosing just two settings. Isn’t that incredible?
Which version of LR b/c on mine I don’t have those options. Under profile, I can only see embedded.
In my Photoshop I only have one default option “Matrix” not “Adobe Standard” and it doesn’t give me any other options to choose from 🙁 why is that?