An action is a series of steps recorded in Photoshop. Actions can enhance photos, change the look of an image, and even compile your photos into templates, and more. Actions are shortcuts designed to save photographers time.
Presets are a series of steps recorded in Lightroom software. They can enhance photos, change the look of an image and more. Presets are shortcuts designed to save photographers time.
Overlays, Logos, Templates, etc
Overlays, logos, templates, etc. can all be used in both Photoshop (all versions) and Photoshop Elements (all versions) as well as software other than Photoshop as long as layers are supported. Overlays can also be used in Lightroom if utilizing the plugin ON1 Photo 10.
If you are interested in ON1 Photo 10 for Lightroom, they offer a 60 day free trial for new users. You can see more details on their website here.
If you are interested in purchasing this plugin, you can do so here.
Photoshop Actions and Photoshop Elements Actions
Our actions have been tested and are compatible with English versions of Photoshop CS2-CS6, CC+ (Creative Cloud) and Photoshop Elements 11-18+ and work with both PC and MAC computers. No actions, however, are compatible with the software sold through the Mac Apple store. All action collection product pages on our website will state which editing software they are compatible, be sure to check this before you purchase as it might change. If you aren’t sure if a product is compatible with your software, please submit a support ticket and we will assist you with this.
Click here to see our article: Adobe Photoshop Software 101: Everything You Need to Know
If you are interested in Photoshop CC, Adobe offers a free 30 day trial of the latest version of Photoshop. You can subscribe to CC for as low as $9.99/month! You can see more details on their website here.
If you are interested in using Photoshop Elements instead, Adobe also offers a free 30 day trial as well, and offers its software at a great price. You can view the Photoshop Elements software details here.
Lightroom Presets
Our Lightroom presets have been tested and are compatible with English versions of Lightroom 4-6, CC+. Some brushes might not be compatible for Lightroom 4, but it will be noted on the product page if that is the case. All Lightroom collection product pages on our website will state which editing software they are compatible, be sure to check this before you purchase as it might change. If you aren’t sure if a product is compatible with your software, please submit a support ticket and we will assist you with this.
If you are interested in Lightroom CC, Adobe offers a free 30 day trial of the latest version of Lightroom. You can subscribe to CC for as low as $9.99/month! You will also get Photoshop CC with this subscription. You can see more details on their website here.
All results will be relatively different depending on several factors such as lighting in your image, your monitor calibration, and how you customize each action, template, etc.
You can purchase individual products here: summeranastore.com
Looking to access a multitude of products and photography education?
If ordered from either Summerana.com, all downloads are instant, meaning when your order is completed and your email gets to you, you will have instant access.
If ordered from our Etsy site, there are some that are instant downloads, and there are some (generally the downloads that are too large for Etsy to host) that will be sent to you within 24-48 hours.
After placing your order, you’ll be granted immediate download permissions as soon as you receive your order confirmation email (your email will be sent to the email you have purchased/signed up with) which contains your login info to your membership library.
If purchasing an individual product:
From the date of purchase, you will have 30 days access to your product. Within that time frame you can download your products as often as you need to.
If signing up as a monthly member/subscriber:
If you sign up as a monthly subscriber, you’ll have unlimited access until cancelled.
We advise that you download all of your goodies asap, and back them up so you never lose them.
Unfortunately sales are only available for the time stated. To keep up with sales, please be sure to subscribe to our newsletters and notifications on our Facebook Page.
To see our terms of service you can visit this page.
To view our privacy policy you can visit this page.
Unfortunately there is no way to download all of your downloads at once. Each product must be downloaded separately to minimize downloading time, server space, as well as to prevent having to also download links for products you might not need (such as duplicates, or for example, PSE products if you only have PS software) thus taking up too much unnecessary space on your hard drive.
Templates, brushes, actions, and logo’s are all small files and do not take up much space. The large files, are the ones that contain large images (png/jpeg), which tend to take up more space and have a longer downloading time depending on your internet speed. 341 MB is around the largest file in our shop.
You will find, however, that you might not need to download every file. There are both Photoshop (PS) and Photoshop Elements (PSE files) and if you only use one type of software, you might have no use for the other version. You might also not want to download every product depending on what you might need for your business (for example, you might not have a use for multiple logo’s if you already have one).
While we are not able to offer an official trial with downloadable products, we do offer mini freebies for our newsletter subscribers to try out. You can subscribe for freebies here.
Please note: The products available as a freebie are subject to change at any time and may not be a complete collection.
Yes you may as long as you are the sole user of the products.
We offer step by step tutorials as well as on-going support from us to help you along the way as we love to help! There are plenty of product how to videos in the library membership, which will show you exactly how the products work (and how easy the steps are!).
You can also view video tutorials on my Youtube channel.
To further help, there are instructional layers in each of the templates/overlays, and most actions contain ‘stops’ which are messages that help you along the way as your play your actions.
You may contact our support for one on one help anytime, by emailing us at [email protected]
Unfortunately we do not offer this service so as to keep the costs lower for our members/customers.
We take website security issues very seriously and we use the latest industry-standard SSL encryption to protect your personal information. Please notice the small pad-lock icon in the locked position that will appear in the lower- right corner or upper-right corner of your browser during each of the pages of the checkout process.
We will never sell or rent your personal information to any third party. You can view our full privacy policy here.
Congrats on becoming a Summerana Member! (If you are not already a member, you can learn more about that and sign up here.)
The members library is where you will be able to access all of your Summerana products, downloads and tutorials if you are a monthly or annual member. All future releases will be automatically added to your library the moment they are released.
After placing your order, you’ll be granted immediate download permissions and login details to your account on Summerana.com.
Please watch the below video walkthrough to get a brief tutorial on how to navigate your members library. Keep in mind that we are always adding new products, categories, etc. so it may not look exactly the same as your current library.
You can also see a full product and video index of all products/videos here for easy navigation.
If you need additional help, please check out our help center, or email us at [email protected].
After placing your order, you’ll be granted immediate download permissions and login details to your account on Summerana.com.
You downloads are located at the bottom right of each product page.
Here is a video walkthrough showing you where to find your downloads (please note this is not an exact replica of the membership, it’s a bit outdated since so many things have been added since then, but it will show you how to access everything):
You can also see a full product and video index of all products/videos here for easy navigation.
If you purchased payment plan
Your membership will cancel after one 365 days. Payments will be made monthly.
If you purchased an quarterly membership:
Your membership will renew every three months on the same date you signed up unless you have cancelled it beforehand.
If you purchased an annual (yearly) membership:
Your membership will renew once a year on the same date you signed up unless you have cancelled it beforehand.
We make it very easy to cancel your subscription/membership if needed.
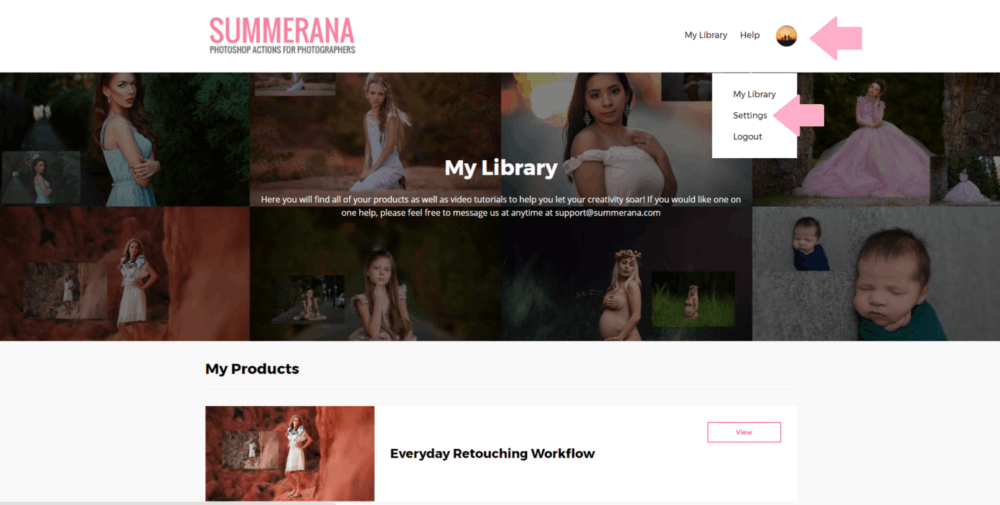
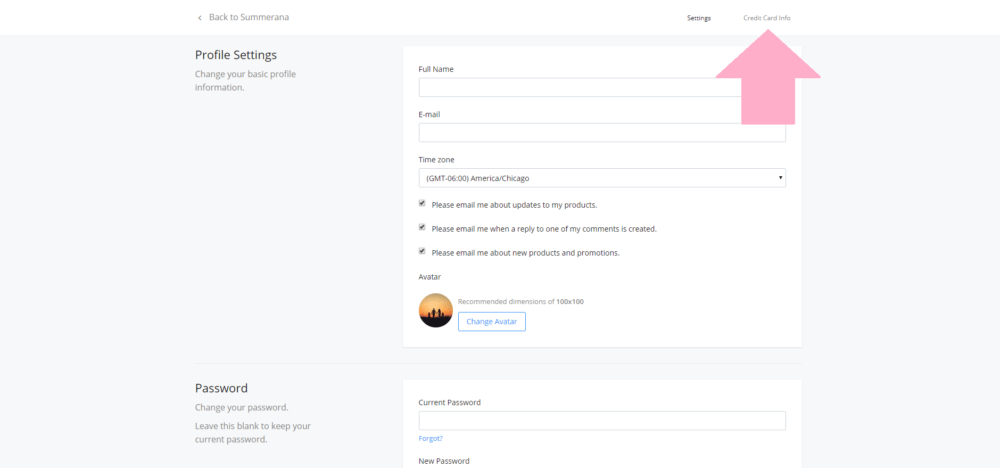
To cancel your monthly subscription/membership, simply log into your account on Summerana.com, go to settings, then at the top you will see “credit card info” and select cancel. Here is the direct link to this page where you can cancel after logging in.
To change your credit card info, simply click your profile, go to settings, then at the top you will see “credit card info” where you can change it.
Here is a walk through:
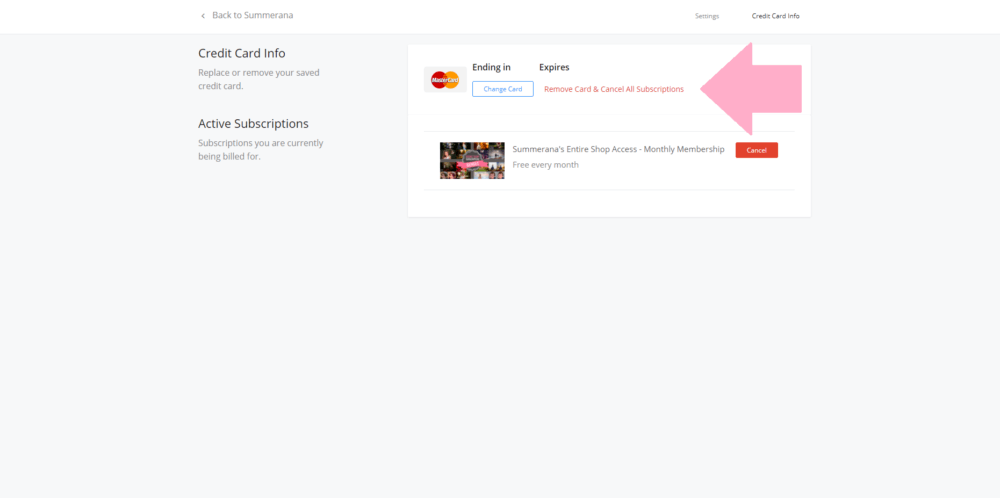
Please note that removing your credit card from your account does not mean it won’t charge your account as it is still connected through our payment processing center (paypal and stripe). You must cancel your subscription/membership as explained above.
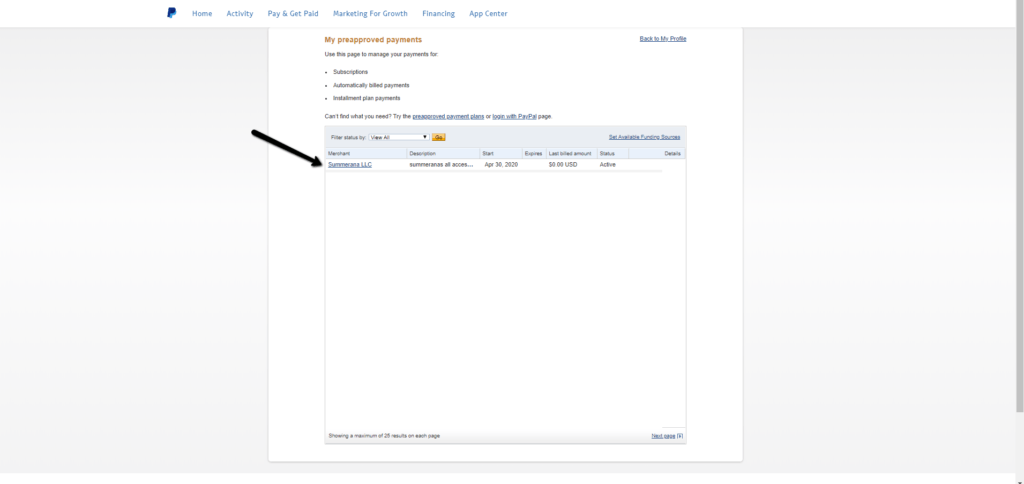
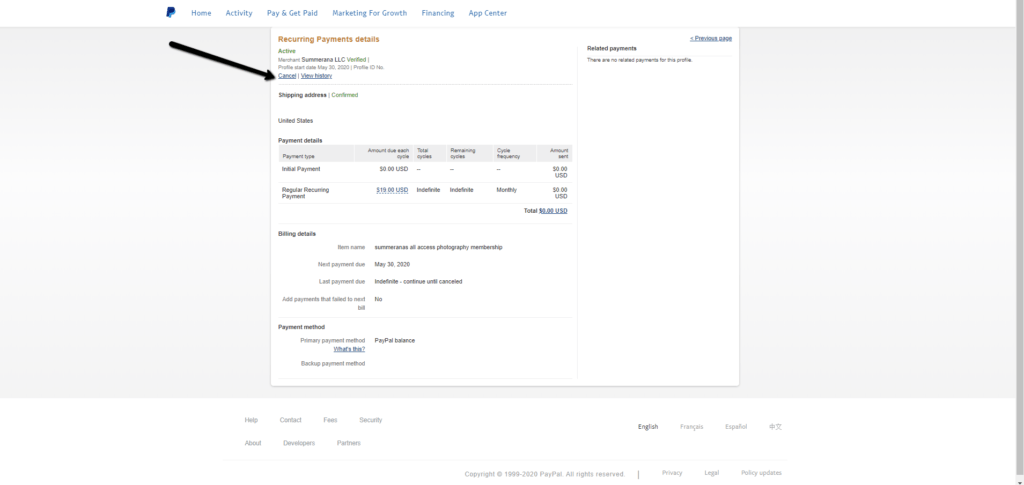
If you signed up using Paypal, you will go to “Manage Subscription in Paypal” then select “Summerana LLC” as the merchant. Once selected, you will see the option to cancel on the Recurring Payment Details page. 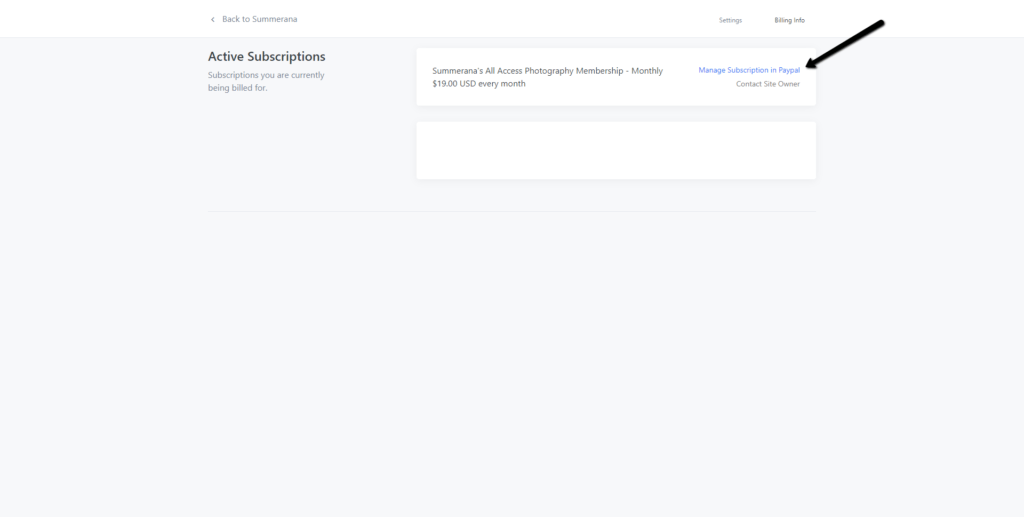
If you are a member, any new products will be added directly to your library. You will have the ability to download them as soon as they are uploaded.
The Payment plan option is not a subscription, it is a commitment to being charged the annual rate of 299.88 over a period of 12 payments.
The subscription is a quarterly or annual fee that can be cancelled at any time. Once cancelled there will be no further payments due.
We are thoroughly insistent in making sure our website is at all times secure and safe for our users. Unfortunately sometimes that can mean you might be seen as a security risk if your IP has too many failed attempts in a short period of time and you might be blocked from logging in.
To fix this, simply email us at [email protected] with the email you have ordered with and we will make sure you are able to log in safely. To prevent this from happening again in the future, be sure to tuck your login and password somewhere safely so that you are able to login successfully without problems.
We understand how devastating this can be, especially if you use our products daily. We offer a free replacement of any individual purchase made as long as you are able to provide proof of purchase. You can email us with your proof of purchase at [email protected].
Please note that this does not include memberships /subscriptions, you must re-sign up as a member to download products again.
We recommend backing up your collections to keep your files secure no matter what.
What is a zipped file?
A zipped file is what all products are first downloaded as onto your computer. This keeps them all in place and organized for when you are ready to dive into your product’s individual folders.
Does my computer come with software to unzip my files?
Most computers come with unzipping/extracting software, but if it does not you can download free unzipping programs online specific for your operating system. A recommended unzip program for PC is 7zip, and a recommended one for Mac is YemuZip.
How do I unzip my files?
To unzip your file you must right click each individual zipped file, then select ‘extract all’ or ‘unzip’ as shown in the screenshot below:

Next it might give you the option to choose where you want your extracted folders to go. Be sure you know where you zip file has been saved on your computer so you can easily find it later. You might also have the option to open your extracted files right away after the extraction is complete in a new window.
Here is a full step by step screenshot:

Once you have located your unzipped folders, they should look similar to this:

Clicking on the individual folders will take you to the different file types that need to be uploaded. Each collection type (actions, brushes, templates, etc.) will need to be uploaded separately.
Clicking on the individual folders will take you to the different file types that need to be uploaded. Each collection type (actions, brushes, templates, overlays, etc.) will need to be uploaded separately into Photoshop and Photoshop Elements as they contain different file types (PSD, PNG, ABR, ATN, etc.). They cannot all be uploaded the same way.
Here you will see how they are uploaded:
- How to Use and Upload Brushes in Photoshop
- How to Install Photoshop Actions
- How to Install and Use Photoshop Overlays
- How to upload actions, brushes, and overlays in Photoshop Elements
 To further help, there are instructional layers in each of the templates/overlays, and most actions contain ‘stops’ which are messages that help you along the way as your play your actions. Some collections will even contain actions that help you apply your overlays directly to your images.
You may encounter one of the following errors when trying to unzip your files on a mac computer when you do not have enough space to expand your file:
“Unable to expand “{my file}” into “{my folder}”.
(Error 2 – No such file or directory.)”
“Unable to expand “{my file}” into “{my folder}”.
(Error 1 – Operation not permitted.)”
“Reasons of unzip files on Mac error 1 or 2:
Typically, you receive ‘unable to expand zip file Mac error 2 or 1’ due to lack of folder permission where you are expanding the file. You may not have assigned correct location to expand the file. The unzip error Mac also occurs if there is not enough free disk space to expand the file.
Fix unzip error Mac:
In order to expand zipped files on Mac, you should make sure that you have appropriate permission on both zipped file and destination folder. You also need to feed correct location where you are expanding the zipped file. You should make sure that there is enough free space on Mac hard disk to perform the operation. If you are to expand about 200MB file then there must be at least 400MB free disk space for successful unzip operation.”
You can see instructions on how to check your computers memory here. Be sure to free up some space, then try to unzip your file again.
Some of the bigger collections have been split in half and come as two separate downloads (one download for the overlays and one download for the actions, for example) and it will be a separate file available for download in your account instead of being included in your zipped file.
The reason for this is that the action collection might be used for several other collections, and we wanted to help you avoid having to download the same action collection multiple times, thus taking up room on your hard drive. Another reason we split them up, is because of the fact that the PNG/JPEG overlay files are 300DPI (HUGE) files. While they are huge for a great reason (high resolution printing) they can take longer to download. Splitting the downloads helps lessen the time since your zipped file will not be as huge and your download time will not be as long.
Your separate downloads will be labeled differently in your account, and may not always be next to each other.

This might pop up occasionally when you are trying to ‘Save’ over the template after editing it. To fix this problem, simply ‘Save as’ instead under a different name/different folder on your computer.
Individual products:
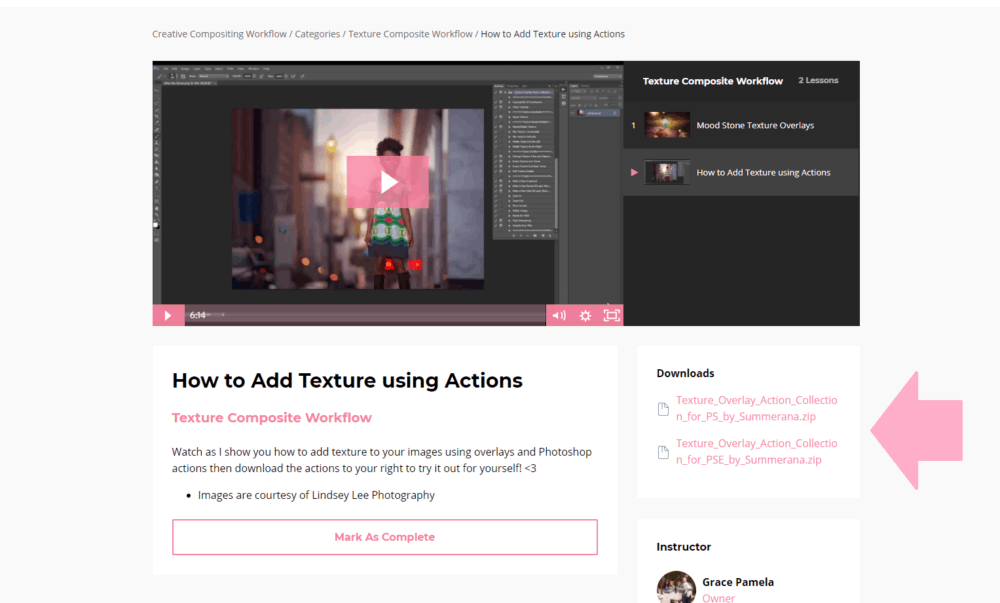
Individual product video tutorials can be found on the individual product pages, or you can view them all in one place on our Youtube channel here. If you have purchased an individual product, you will have access to a mini library that contains your downloads and your video tutorials for that product.
Membership Library:
If you are an annual or monthly member, you will have access to our entire library which contains all of your products and video tutorials on the individual pages inside the library. You can view a quick video walkthrough of where to find everything inside the library here.
All templates have a clipping mask action included to make adding images easier and faster! View the video tutorial below to learn how it works.
We recommend using a professional lab for optimal printing results! Always preview your final print product before completing your lab order to make sure everything is perfect. We use Millers Lab specs for our templates.
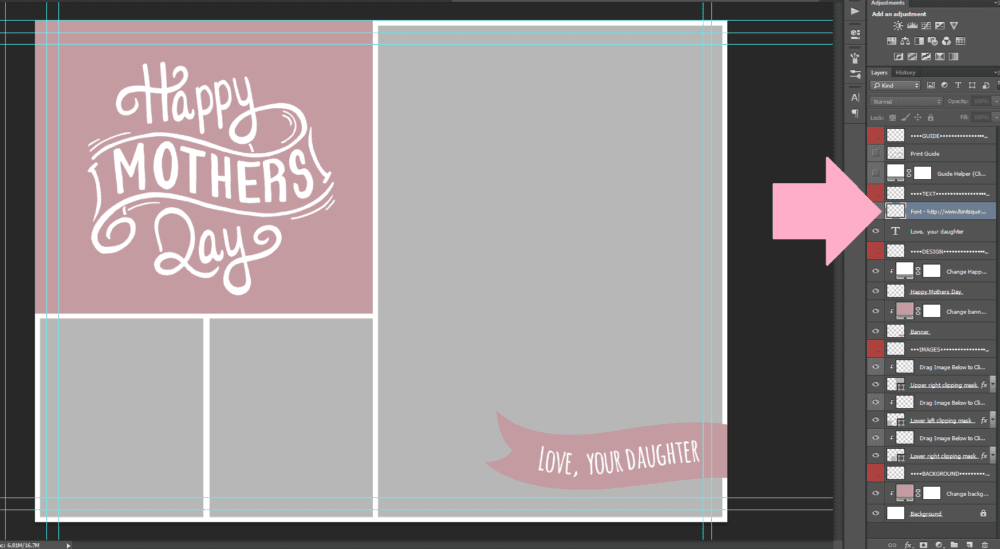
If you open your psd logo file in Photoshop, you’ll notice there is a Guide layer which has your instructions. After reading the instructions on how to edit your logo, you’ll need to hide this layer by clicking the eye or you can drag the layer to the trash bin. To edit your text and colors, you’ll need to double click the ‘T’ on your text layer, and double click the color box that is clipped to your logo design.
![]()
When you are done customizing your logo, make sure your logo layer is selected, then go to File>Merge to merge all of your text, colors, design to one layer that can then be dragged onto your images. Feel free to delete any other hidden layers to clean up your final psd file. You may save your logo (make sure the background is still transparent, do not flatten your logo) as a png, or keep it as a psd file.
![]()
Layer masks are an alternative to the Eraser Tool in Photoshop and Photoshop Elements. If you see a layer mask attached to your layer, you can use it to reveal or conceal your layer without erasing it for good. A white layer mask reveals, a black layer mask conceals. You use the black paint brush on the white layer mask to “erase” (conceal) and a white paint brush on a black layer mask to “paint” (reveal). If you make a mistake you can switch your paint brush and paint it back. Remember to double click your layer mask so you do not paint on your actual image.
Click here to read an in depth article on layer masks, and to watch a video tutorial.
Some overlay collections will contain actions that help you apply your overlays directly to your images. This can make your overlay application process pretty speedy.
But what happens when your overlays don’t pop up for you? Where are they?
When your action prompts your software to locate your overlay to place onto your image, it may not open immediately to the ‘correct’ folder. Your computer has no way of telling exactly which folder to open, and this is out of reach for a Photoshop action to instruct. Instead, you will need to locate the overlay folder on your computer.The reason the overlays pop up for us right away in some of our video tutorials, is because our computer is set to open the folder that was last opened. We set it this way in our tutorial so that the viewer (you!) will not have to watch us sift through personal folders to find the one we are looking for. We do not mean to cause confusion, but rather speed up the video tutorial time.In order to have your overlays ‘pop up’ for you, you will need to locate the overlay folder on your computer (the location where you sent it after unzipping), and open it. If you cannot remember where you prompted your computer to extract your zipped file, you can try checking your ‘downloads’ folder, or you can manually enter the collection name (or ‘Summerana’) in your search bar. You can also learn how to organize your Photoshop files so that they are easier for you to find on your computer, and shorten your time when searching for each folder. Once you have placed your overlay, your computer should be able to ‘remember’ the last folder you were working out of, and it should open it from then on until you open a different folder.Note: This process works for all files, when you are uploading them into your Photoshop software. This includes your Photoshop (ABR) brushes, (PSD) templates, (ATN) action files and your client images.
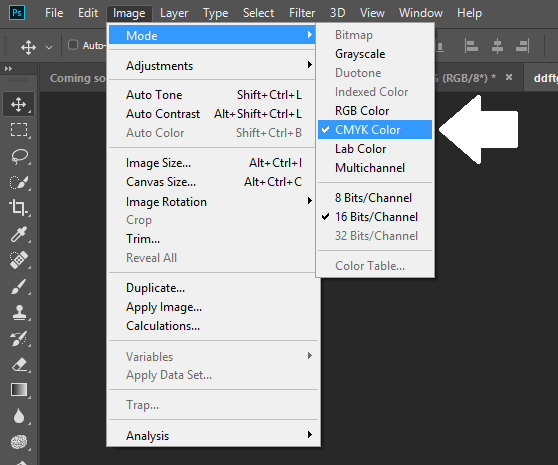
It could be possible that your mode is set to greyscale. Make sure the image/overlay you are transferring to as well as the image/overlay you are transferring it to is in the same color space by trying either of the following: (Image > Mode> RGB Color).
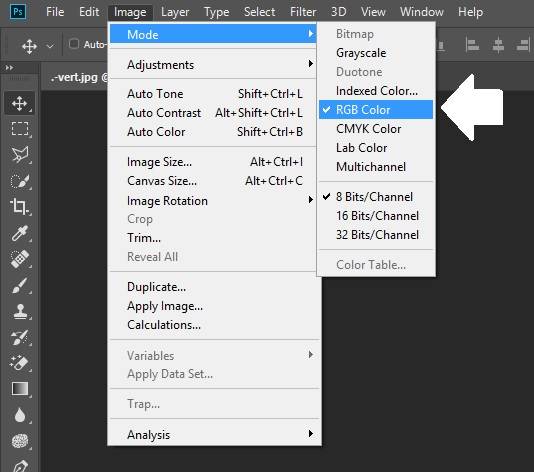
(Image > Mode> CMYK Color)